Digital Circuit Design Course Project디지털 회로 설계 수업 프로젝트
Adder Tree (12-input → 4-bit) — Schematic-to-Layout Integration Adder Tree (12-input → 4-bit) — 회로도-레이아웃 통합 설계
This project documents the design and integration of a tree-based compressor that reduces 12 one-bit inputs (XT0–XT11) into a 4-bit output (bS0–bS3) using a hierarchy of Full Adders (FA: 3:2 compressor) and Half Adders (HA: 2:2 compressor).
Full Adder(FA: 3:2 압축기)와 Half Adder(HA: 2:2 압축기)의 계층 구조로 12개의 1비트 입력(XT0–XT11)을 4비트 출력(bS0–bS3)으로 압축하는 트리 기반 압축기의 설계와 통합 과정을 기록한 프로젝트입니다.
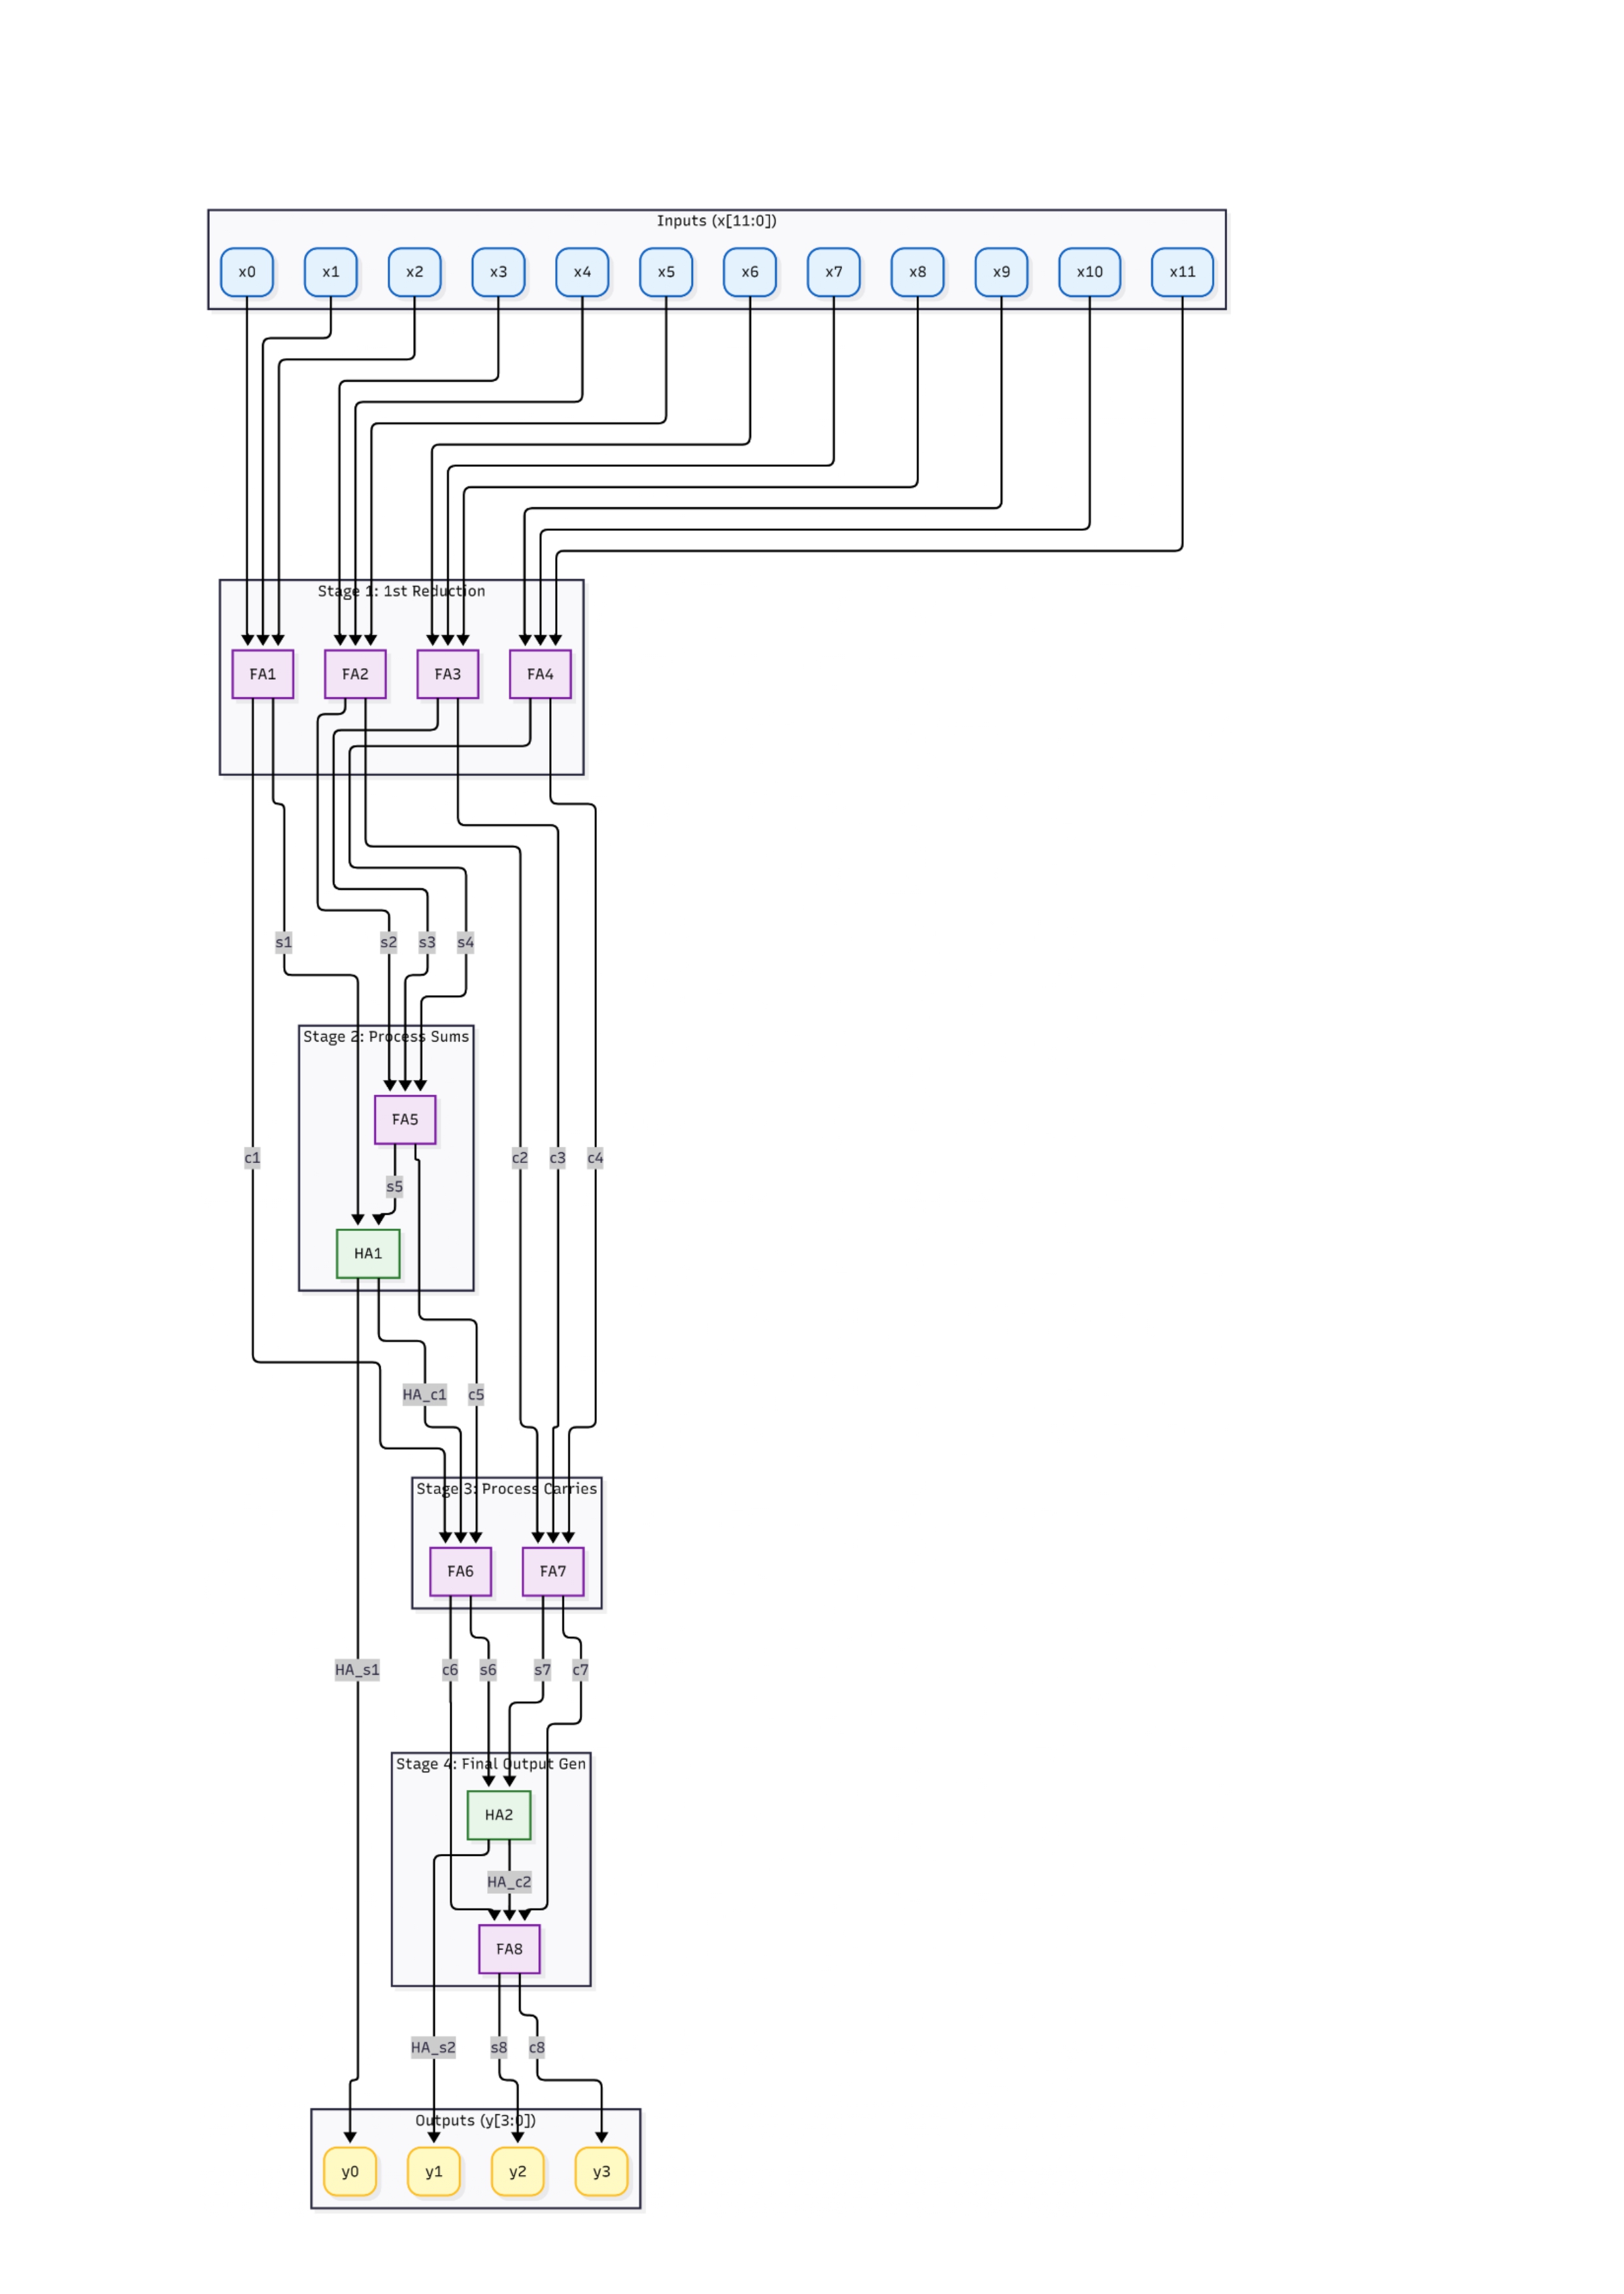
Overview개요
- Technology: FreePDK45 (45nm educational PDK)
- Tools: KLayout, ngspice
- Flow: Cell design (FA/HA) → Cell DRC/LVS → Tree schematic → Tree layout (hierarchical) → Tree DRC → Tree LVS (PASSED)
- 공정: FreePDK45 (45nm 교육용 PDK)
- 도구: KLayout, ngspice
- 흐름: 셀 설계(FA/HA) → 셀 DRC/LVS → 트리 회로도 → 트리 레이아웃(계층적) → 트리 DRC → 트리 LVS (PASSED)
1. Motivation1. 동기
A straightforward Ripple-Carry style accumulation of 12 inputs would introduce long carry propagation. Instead, this design adopts a Tree-based Compression (Compressor Tree) to reduce critical path length toward O(log N) behavior.
12개 입력을 단순 Ripple-Carry 방식으로 누적하면 캐리 전파가 길어집니다. 대신 이 설계는 트리 기반 압축(Compressor Tree)을 채택해 크리티컬 패스 길이를 O(log N) 수준으로 줄였습니다.
Key goals:핵심 목표:
- Minimize worst-case delay (T_worst) of the overall tree
- Reduce total dynamic energy (E_total) and physical area via cell sizing and placement strategy
- Validate correctness and feasibility through a full schematic-to-layout verification flow
- 전체 트리의 최악 지연(T_worst) 최소화
- 셀 사이징과 배치 전략으로 총 동적 에너지(E_total)와 면적 절감
- 회로도-레이아웃 전체 검증 흐름으로 정확성과 실현 가능성 검증
2. Architecture Overview (Compressor Tree)2. 아키텍처 개요 (Compressor Tree)
2.1 Design Rationale2.1 설계 근거
The compressor tree was selected for:
압축 트리를 선택한 이유:
- Speed: parallel reduction reduces sequential carry chain length
- Compression efficiency: staged reduction using FA (3:2) and HA (2:2)
- Modularity: bottom-up approach (verify FA/HA first, then integrate)
- 속도: 병렬 축소로 순차적 캐리 체인 길이 감소
- 압축 효율: FA(3:2)와 HA(2:2)를 활용한 단계적 축소
- 모듈성: 상향식 접근 (FA/HA를 먼저 검증한 뒤 통합)
However, this bottom-up strategy also exposed a classic physical design tradeoff: aggressive per-cell transistor sizing improved local delay, but hurt standard-cell regularity (mismatched cell heights / irregular pin locations), increasing routing complexity and making hierarchical LVS closure harder.
다만 이 상향식 전략은 전형적인 물리 설계 트레이드오프도 드러냈습니다. 셀별로 공격적인 트랜지스터 사이징은 국소 지연을 개선했지만 표준 셀 규칙성을 해쳐 (셀 높이 불일치, 불규칙한 핀 위치) 라우팅 복잡도가 커지고 계층적 LVS 클로저가 어려워졌습니다.
2.2 Functional Correctness (Schematic Level)2.2 기능 정확성 (회로도 수준)
A full tree schematic was built using exported symbols from the chosen FA/HA cells. Schematic simulations confirmed output bits match expected arithmetic results with full swing observed on outputs.
선정된 FA/HA 셀에서 내보낸 심볼로 전체 트리 회로도를 구성했습니다. 회로도 시뮬레이션에서 출력 비트가 기대한 산술 결과와 일치하고 출력에서 풀 스윙이 관찰됨을 확인했습니다.
3. Cell Selection (FA / HA)3. 셀 선정 (FA / HA)
3.1 Full Adder: FA_36p
Multiple FA topologies were evaluated. The final tree uses FA_36p, which reduces transistor count by using:
여러 FA 토폴로지를 평가했고, 최종 트리에는 트랜지스터 수를 줄인 FA_36p를 사용했습니다:
- MUX-based logic decomposition
- CMOS Transmission Gate (CMOSTG) blocks
- MUX 기반 로직 분해
- CMOS Transmission Gate (CMOSTG) 블록
Final sizing (best observed delay point):최종 사이징 (최적 지연 지점):
- PMOS W ≈ 100 nm
- NMOS W ≈ 120 nm
3.2 Half Adder: HA2 (XOR + NAND + inverter)
HA2 uses XOR + NAND structure with inverter for signal restoration. Best performance in tree was obtained by differentiated sizing per block:
HA2는 신호 복원을 위한 인버터가 포함된 XOR + NAND 구조입니다. 블록별 차등 사이징으로 트리 내 최고 성능을 얻었습니다:
- inverter ≈ 300 nm
- XOR ≈ 100 nm
- NAND ≈ 180 nm
- 인버터 ≈ 300 nm
- XOR ≈ 100 nm
- NAND ≈ 180 nm
4. Delay & Energy Measurement4. 지연 및 에너지 측정
4.1 Results Summary (Schematic-Level Tree)4.1 결과 요약 (회로도 수준 트리)
- T_worst ≈ 384 ps
- E_total ≈ 4.29 × 10⁻¹⁴ J
- T_worst × E_total ≈ 1.65 × 10⁻²³ (J·s)
Contrary to initial hypothesis, worst delay was not always the falling transition.
초기 가설과 달리 최악 지연이 항상 하강 전이에서 발생하지는 않았습니다.
5. Layout Strategy (Cell → Tree Integration)5. 레이아웃 전략 (셀 → 트리 통합)
5.1 Cell Layout Summary (Completed)5.1 셀 레이아웃 요약 (완료)
Both FA and HA cells were designed with shared diffusion maximization and consistent power rail placement.
FA와 HA 셀 모두 공유 확산 영역 최대화와 일관된 전원 레일 배치를 적용해 설계했습니다.
- FA_36p: 3130 nm × 1445 nm (DRC/LVS PASSED)
- HA2: 1945 nm × 1695 nm (DRC/LVS PASSED)
5.2 Tree Layout (Hierarchical Assembly)5.2 트리 레이아웃 (계층적 조립)
- Tree area: 29230 nm × 1695 nm
- DRC: PASSED
- LVS: PASSED
- 트리 면적: 29230 nm × 1695 nm
- DRC: PASSED
- LVS: PASSED
Full verification complete: Both DRC and hierarchical LVS passed at the top level, confirming schematic-to-layout equivalence across the entire compressor tree.
전체 검증 완료: 최상위 수준에서 DRC와 계층적 LVS를 모두 통과해, 전체 압축 트리의 회로도-레이아웃 등가성을 확인했습니다.
6. What This Project Demonstrates6. 이 프로젝트가 보여주는 것
- Built a non-trivial compressor tree from verified transistor-level cells
- Performed delay/energy extraction based on transition-level measurements
- Implemented full-custom layout with complete DRC and LVS sign-off at top level
- Closed hierarchical LVS — resolved physical connectivity, power net naming, and pin definition issues across the full hierarchy
- Demonstrated end-to-end schematic-to-layout verification flow from cell level to tree level
- 검증된 트랜지스터 수준 셀로 규모 있는 압축 트리 구축
- 전이 수준 측정 기반의 지연/에너지 추출 수행
- 최상위 DRC와 LVS 사인오프까지 완료한 풀커스텀 레이아웃 구현
- 계층적 LVS 클로저 — 전체 계층에 걸친 물리 연결, 전원 넷 네이밍, 핀 정의 문제 해결
- 셀 수준부터 트리 수준까지 회로도-레이아웃 엔드투엔드 검증 흐름 시연